Quantcast
Channel: Networking Guides – pfSense Setup HQ
Viewing all 115 articles
Browse latest View live

UPS Monitoring with NUT in pfSense

$
0
0
UPS monitoring

NUT configuration page under pfSense 2.1.3.

Network UPS Tools (NUT) is a collection of programs which provide a common interface for UPS monitoring and administering, as well as monitoring and administering PDU (power distribution unit) and SCD (secure cryptographic device) hardware. It uses a layered approach to connect all of the parts.

The UPS monitoring capabilities of NUT are extensive. Drivers are provided for a wide assortment of equipment. They understand the specific language of each device and map it back to a compatibility layer. Any device supported by NUT can be handled transparently with a uniform management interface. This information is cached by the network server upsd, which then answers queries from the clients. upsd contains a number of access control features to limit the abilities of the clients. You can set it up so only authorized hosts may monitor or control your hardware. Since the notion of monitoring over the network is built into the software, you can hang many systems off one large UPS, and they will shut down together. You can also use NUT to power on, off, or cycle your data center nodes, individually or globally through PDU outlets.


UPS Monitoring with NUT: Installation and Configuration

Installing NUT for UPS monitoring under pfSense is easy. Navigate to System -> Packages and scroll down to NUT on the list. Press the “plus” button to the right of the listing to select the package, and press the “Confirm” button on the next page to confirm installation. It should take a few minutes for installation to complete.

Once installation is complete, there will be a new item on the “Services” menu called “NUT“. If you navigate to “NUT“, you will find two tabs: “NUT Settings” and “NUT Status“. Under “Nut Settings“, there is a “General Settings” header with two options: the “UPS Monitoring” dropdown box and the “Power Down Instead of Halt” check box. The “UPS Monitoring” dropdown box has several options: “Disabled” (to disable UPS monitoring), “Local UPS” (to monitor a local UPS), “Remote SNMP UPS” (to monitor a remote UPS using the Simple Network Management Protocol), “Remote NUT UPS” (for UPS monitoring of a remote UPS using NUT).

The next heading, “Remote Access Settings“, lets you specify a remote access address, username and password. Under “Local UPS Settings“, you can specify the “Local UPS Name” and the “Local UPS Model” (you can pick a generic profile if your specific model is not listed). For “Local USB Port“, you can specify “auto (USB only)” in most cases. But if you are using another port, you can specify it here (e.g. cuau0 for COM1, cuau1 for COM2, ttyu0 for the first console device, etc.). At “Local UPS Generic Type“, you can specify the UPS type (APC, Best Power Patriot, etc.) and at “Local UPS Cable Type” you can specify the cable type.

The next heading is “Remote SNMP UPS Settings“. You can specify the “SNMP UPS Name” and the “SNMP UPS Address” (its IP address). At “SNMP UPS Community“, you can set the community name (default = public). Note that a RW community name is required to change UPS settings (as for a powerdown). At “SNMP Version“, you can specify the SNMP version (default = v2). At “SNMP UPS MIB“, you can set MIB compliance. With “auto“, the driver will try a select set of SNMP objects until it finds one that the device responds to. Note that since NUT 2.6.2, snmp-ups has a new method that uses sysObjectID (which is a pointer to the preferred MIB of the device) to detect supported devices. This renders void the use of the “MIB” option. The last two settings under this heading are “SNMP UPS Polling Freq” (default is 30 seconds), and “Disable transfer OIDs” (for use on APCC Symmetras).

The last heading is for “Remote NUT UPS Settings“. Here you can specify the “Remote NUT UPS Name” as well as the address, username and password. Press the “Change” button at the bottom of the page to update your UPS monitoring  settings. Now, you can click on the “NUT Status” tab and monitor the status of your UPS.


External Links:

The official Network UPS Tools website


The post UPS Monitoring with NUT in pfSense appeared first on pfSense Setup HQ.


Backup Your Network with Bacula

$
0
0
backup

Adding a director to bacula-client under pfSense 2.1.3.

Bacula is an open source, enterprise-level computer backup system for heterogeneous networks. It is designed to automate backup tasks that had often required intervention from a systems administrator. Bacula supports Linux, UNIX, Windows and Mac OS X backup clients, although here we are mainly concerned with the Bacula package running under pfSense. It also supports a range of professional backup devices, including tape libraries. Administrators and operators can configure Bacula via a command-line console, GUI or web interface. Its backend is a catalog of information stored by MySQL, PostgreSQL, or SQLite. Bacula is the collective work of many developers, including Kern Sibbald, and has been under development for fourteen years as of this writing. It is open source and is available without fees for both commercial and non-commercial applications, under the AGPL version 3 license, with exceptions to permit linking with OpenSSL and distributing Windows binaries.

Bacula Backup: Installation and Configuration

The Bacula server has to be installed separately. Depending on which platform/operating system you are using, you may have to compile Bacula, although Bacula seems to be present in the Red Hat Enterprise Linux (RHEL) and CentOS repositories. To install the Bacula client under pfSense, navigate to System -> Packages, and scroll down to bacula-client on the package list. Press the “plus” button to the right of the entry, and press “Confirm” to confirm installation. Installation of Bacula should not take long.

Once installation is complete, there will be a new entry under the “Services” directory called “Bacula-client“. The configuration files for Bacula will not be generated until you have saved a configuration change. To understand the configuration options, it helps to understand the architecture of Bacula.


// ]]>

Bacula is made up of the following five major components or services: Director, Console, File, Storage, Catalog and Monitor services:

  • Director: The director service is the program that supervises all the backup, restore, verify and archive operations. The system administrator uses the director to schedule backups and to recover files. The director runs as a daemon in the background.
  • Console: The console service is the program that allows the administrator or user to communicate with the director. Currently, the console is available in three versions: text-based console interface, QT-based interface, and a wxWidgets graphical interface. The simplest is to run the Console program in a shell window. Most system administrators will find this completely adequate. The GNOME GUI interface is not yet complete, but has most of the capabilities of the of the shell console. the third version is a vxWidgets GUI with an interactive file restore.
  • File: The file service is the software program that is installed on the machine to be backed up. The file services are also responsible for the file system dependent part of restoring the file attributes and data during a recovery operation.
  • Storage: The storage services consist of the software programs that perform the storage and recovery of the file attributes and data to the physical backup media or volumes. In other words, the storage daemon is responsible for reading and writing your tapes or other storage media.
  • Catalog: The catalog services are comprised of the software programs responsible for the maintaining the file indexes and volume databases for all files backed up. Bacula currently supports three different databases: MySQL, PostgreSQL, and SQLite.
  • Monitor: The monitor service is the program that allows the administrator or user to watch the current status of Bacula directors, file daemons, and storage daemons. Currently, only a GTK+ version is available.

If you navigate to Services -> Bacula-client, there are three tabs: “Directors“, “FileDaemon“, and “View Configuration“. The first tab, “Directors“, enables you to add directors by pressing the “plus” button on the right side. You can specify the “Director Name” and provide a description in the “Description” field. You need to supply a password at “Password“, and at the “Director type” dropdown box, you can select the director attributes. “Director” just specifies that it is a director. “Local” causes the Monitor attribute in bacula-fd.conf to be set to “yes” and the director attribute in the Messages section of bacula-fd.conf to be set to this director. Setting the director type to monitor causes the Monitor attribute to be set to “yes“, but leaves the director attribute unchanged.

On the “FileDaemon” tab, there are currently only two settings: “File Daemon port” (the default is 9102), and “Maximum Concurrent Jobs” (the default is 20). The Volume format becomes more complicated with multiple simultaneous jobs; consequently, restores may take longer if Bacula must sort through interleaved volume blocks from multiple simultaneous jobs. Thus, you should probably leave “Maximum Concurrent Jobs” set to 20 unless you have a specific reason otherwise. Finally, “View configuration” allows you to view (but not alter) the bacula-fd.conf file.


// ]]>

External Links:

The official Bacula web site

Bacula on Wikipedia

The post Backup Your Network with Bacula appeared first on pfSense Setup HQ.

Virus Check with HTTP AntiVirus Proxy

$
0
0
virus check

The HTTP Proxy settings page in HAVP under pfSense 2.1.3.

HTTP AntiVirus proxy (HAVP) is a proxy with an anti-virus filter. it does not cache or filter content, but completely scans incoming traffic while doing a virus check. The main objectives of HAVP are: [1] continuous and non-blocking downloads, and [2] smooth scanning of dynamic and password protected home pages.

HAVP’s virus check works by writing data from a server in a temporary file and hard locks the end of a file. A second fork begins scanning all written data. During this time, the data is sent to the client. You can define the size of data which is held back and only deliver it to the client when scanning is complete. This way, scanning starts simultaneously with the download. If the scanning process is too slow and the file is larger than the defined “hold back data”, you can still receive a virus. Moreover, if the file contains a virus and the file is bigger than the defined “hold back data” buffer size, the download will be canceled without warning.

Virus Check with HTTP AntiVirus Proxy: Installation and Configuration

Like all packages, installation of the HAVP virus check package is fairly easy. Just navigate to System -> Packages and scroll down to HAVP antivirus. Press the “plus” button to the right of the listing, and on the next page, click on the “Confirm” button. Installation of HAVP antivirus will take a few minutes.


Once HAVP antivirus is installed, there will be a new item on the “Services” menu called “Antivirus“. There are three available tabs: “General Page“, “HTTP Proxy“, and “Settings“, containing relevant settings for the HAVP virus check. If you click on the “Settings” tab, you will find several parameters relevant to HAVP antivirus configuration. The “AV base update” dropdown box defines at what interval the antivirus database will update itself. You can update at intervals between 1 and 24 hours. The “Regional AV database update mirror” dropdown box allows you to select the location of the update server. You can specify additional servers in the “Optional AV database update servers” box. The “Log” check box allows you to enable logging; the “SysLog” check box enables the SysLog.

The second tab is “HTTP proxy“. Checking the “Enable” check box here enables the HTTP proxy to perform a virus check. The next setting is the “Proxy mode” dropdown box. If you select “Standard“, clients will bind to the proxy port on the proxy interface. But if you choose “Parent for Squid“, then HAVP will insert itself between the Squid proxy and the WAN interface (Internet). If you have the Squid proxy installed, you probably want to choose this option. “Transparent” causes HAVP to act as a parent for Squid with a transparent Squid proxy, while “Internal” causes HAVP to listen on the loopback on the configured proxy port.

virus check

The HAVP dashboard.

Proxy interface(s)” allows you to select one or more interfaces for client connections to the proxy. Normally, clients will be connecting through the LAN interface, so you probably want to leave only “LAN” selected. “Proxy port” allows you to select the port the proxy server will listen on. The port must be different than the Squid proxy port. You can probably leave it as the default of 3125. Moving further down the page, you probably want to change the “Language” in which the proxy server will display error messages to users.

Most of the remaining “HTTP proxy” settings can remain unchanged, but a few are worth noting. “Max download size” allows you to enter a value (in bytes) of the maximum file download size. But be warned: downloads larger than this size will be blocked if not whitelisted. “Whitelist” allows you to specify URLs that will be accessible to users without scanning, while “Blacklist” allows you to specify URLs that will be blocked. “Enable RAM Disk” allows you to use a RAM disk for HAVP temporary files for a quicker traffic scan in virus checking. The RAM disk size will be either 25 percent of the available system memory or 100 times the maximum scan file size, whichever is greater. “Scan max file size” allows you to select the maximum file size or not set a maximum file size at all. If you set a maximum file size, then file sizes larger than the limit won’t be scanned, so there is a security risk involved in setting this parameter. The “Scan images” check box allows you to scan image files, and “Scan media stream” allows you to scan audio/video streams. The “Log” check box enables logging.

Once you are done configuring the settings, press the “Save” button at the bottom of the page to save the settings. In order to ensure the HAVP virus check is working correctly, you probably should download the EICAR virus test file from eicar.org. The test file is not an actual virus, but contains a standardized signature that is used to test antivirus programs. If the HAVP virus check is working properly, you should be redirected to a page with an access denied message.

If you click on the “General Page” tab, you can see the HAVP dashboard. You will be able to see which services are started, the update status and scanner status, and which if any viruses have been found.

One additional caveat is that HAVP requires a fair amount of memory to work, and if it is enabled on pfSense systems that are towards the low end of pfSense’s memory requirements (e.g. 256 MB), pfSense may become slow and unresponsive. Ideally you should have at least 1 GB of RAM if you are running HAVP.


External Links:

The official HTTP AntiVirus Proxy web site

How to Set Up an HTTP Anti-Virus Proxy Using pfSense and HAVP at hubpages.com

Anti-Malware testfile from eicar.org

The post Virus Check with HTTP AntiVirus Proxy appeared first on pfSense Setup HQ.

BEAST Attack Mitigation in pfSense

$
0
0
BEAST attack

Enabling BEAST attack protection in pfSense 2.1.3.

On September 23, 2011 researchers Thai Duong and Juliano Rizzo demonstrated a proof of concept called Browser Exploit Against SSL/TLS (BEAST). A BEAST attack involves intercepting and decrypting HTTPS cookies. Whenever you log into an HTTPS page, after your authentication, you can see your autenticated page, and if you look carefully at the page’s URL, you can see the session ID. A session ID is a random number or combination of numbers and string that maintains the state of the page, it is assigned by the website server to the client browser. The session ID can be found in either the cookie or the URL of the web browser. Usually, session IDs will be encrypted to prevent hijacking of the session.

A successful BEAST attack entails first sending a malicious JavaScript to run on the victim’s machine. This can be achieved by several means: Cross Site Request Forgery (CSRF), social engineering, a download, or a web page containing JavaScript. This malicious script runs on the victim’s machine and can capture the entire header info and the encrypted cookie that is assigned from the web server running Transport Layer Security (TLS) 1.0 and can then send the information to the website.

Next, the attacker utilizes a vulnerability in SSL/TLS. In TLS 1.0, if there are two identical plaintext messages, then after encryption, the cipher text is the same. Thus, by comparing the encrypted session details and the unencrypted data sent by the script, the attacker can find the initialization vector. Once the attacker gets this information, it can decrypt future cookies sent from the web server.


Using this blueprint, Duong and Rizzo built the BEAST tool, which is capable of decrypting HTTPS cookies and hijacking browsing sessions in order to steal credentials. Major browser makers, except for Apple, addressed the issue on the client side by implementing a technique known as the 1/(1-n) split. The technique stops attackers from being able to predict the initialization vector blocks that are used to mask plaintext data before it is encrypted.

Enabling BEAST Attack Protection in pfSense

Fortunately, pfSense provides some measure of protection against BEAST attacks on your web configurator sessions. If you navigate to System -> Advanced, and click on the “Admin Access” tab, under “webConfigurator“, there is a “BEAST Attack Protection” check box. It is left unchecked by default because it does not work with Hifn cryptographic accelerators, and if it is used when such accelerators are being utilized, the web GUI will not work. If you are not using such cryptographic accelerators, however, you should be able to enable this option without having any issues.


External Links:

Not So Fast on BEAST Attack Mitigations at threatpost.com

BEAST vs. CRIME Attack at resources.infosecinstitute.com

The post BEAST Attack Mitigation in pfSense appeared first on pfSense Setup HQ.

Service Discovery with Avahi

$
0
0
Avahi

Configuring Avahi under pfSense 2.1.3.

Avahi is a free zero-configuration networking implementation, including a system for multicast DNS/DNS-SD service discovery. It is licensed under the GNU Lesser General Public License (LGPL). It allows programs to publish and discover services and hosts running on a local network.

Avahi implements the Apple Zeroconf specification, mDNS, DNS-SD and RFC 3927 IPv4ALL. other implementations include Apple’s Bonjour framework. Avahi provides a set of language bindings and ships with most Linux and BSD distributions. Because of its modularized architecture, major desktop components like GNOME’s Virtual File System and the KDE input/output architecture already integrate Avahi.

Most Linux distros have Avahi available in their repositories, and thus installing Avahi is as simple as invoking apt-get at the command line:

sudo apt-get install avahi-daemon

This will work unless the graphical front end does not have Zeroconf support built into it, in which case you would have to download and compile Avahi from sources, and then recompile the desktop environment to include Zeroconf support.


Service Discovery with Avahi: Installation and Configuration

Fortunately, getting Avahi to work under pfSense is very simple. To install Avahi in pfSense, navigate to System -> Packages, and scroll down to “Avahi”. Press the “plus” button next to the listing, and on the next page, press “Confirm” to confirm the installation. The installation will take a few minutes to complete.

Once installation is complete, there will be a new item on the “Services” menu named “Avahi“. If you navigate to Services -> Avahi, you can configure the settings for Avahi discovery. The “Enable” check box enables the Avahi Bonjour/Zeroconfig proxy. The “Browse domains” edit box allows you to enter domains you would like to have proxied. The “Deny interfaces” list box allows you to specify interfaces that you do not want Avahi to listen on (WAN is disabled by default). Finally, the “Disable IPv6” and “Disable IPv4” disables IPv6 and IPv4 support in Avahi respectively.

Once you have Avahi enabled, systems on interfaces on which Avahi is listening should be able to publish and/or discover Bonjour/Zeroconfig services.


External Links:

The official Avahi web site

Avahi on Wikipedia

The post Service Discovery with Avahi appeared first on pfSense Setup HQ.

Using the OLSR Daemon in pfSense

$
0
0
OLSR

Configuring the OLSR daemon in pfSense 2.1.3.

The OLSR daemon is an implementation of the Optimized Link State Routing protocol. The Optimized Link State Routing Protocol is an IP routing protocol optimized for mobile ad hoc networks, which can also be used on other wireless ad hoc networks. OLSR is a proactive link-state routing protocol, which uses hello and topology control message to discover and then disseminate link state information throughout the mobile ad hoc network.

Link-state routing protocols such as Open Shortest Path First (OSPF) and IS-IS elect a designated router on every link to perform flooding of topology information. The link-state protocol is performed by every switching node in the network. The basic concept of link-state routing is that every node constructs a map of the connectivity to the network, in the form of a graph, showing which nodes are connected to other nodes. Each node then independently calculates the next best logical path from it to every possible destination in the network. The collection of best paths will then form the node’s routing table. Open Shortest Path First (OSPF) takes this one step further, using the information to construct a topology map of the network. It computes the shortest math tree for each route using Dijkstra’s algorithm, a shortest path first algorithm.


This is a workable routing protocol for wired networks, but in wireless ad hoc networks, things are different. Every node in the network is potentially a switching node; hence, a different approach is needed in order to optimize the flooding process. Using Hello messages, the OLSR protocol at each node discovers 2-hip neighbor information and performs a distributed election of a set of multipoint relays (MPRs). Nodes select MPRs such that there exists a path to each of its 2-hop neighbors via a node selected as an MPR. These MPR nodes then source and forward TC messages that contain the MPR selectors. This functioning of MPRs makes OLSR unique from other link state routing protocols in a few different ways. The forwarding path for TC messages is not shared among all nodes but varies depending on the source. Not all links of a node are advertised, but only those that represent MPR selections.

Since link-state routing requires the topology databased to be synchronized across the network, OSPF performs topology flooding using a reliable algorithm. Since a reliable algorithm is hard to design for an ad hoc wireless network, OLSR doesn’t bother with reliability. It simply floods topology data often enough to make sure that the database does not remain unsynchronized for extended periods of time.

OLSRD: Installation and Configuration

Installing OLSRD under pfSense entails navigating to System -> Packages, and scrolling down to the oLSRD entry. Press the “plus” button to the right of the entry, and press the “Confirm” button to confirm installation. OLSRD installation should not take long.

Once OLSRD is installed, there will be a new item on the “Services” menu called “OLSRD“. If you navigate to Services -> OLSRD and press the “plus” button, you can configure OLSRD settings. Checking the “Enable OLSR” check box enables the dynamic mesh linking daemon.

The next setting is the “Link Quality Level” dropdown box. There are three possible settings: 0, 1, and 2. Setting this parameter to 0 disables the link quality extensions, and OLSRD works as it did before (it is RFC-compliant, uses HELLO and TC messages, and calculates routes by minimizing the hop count). Hysteresis will be used, and the links will be more robust at the cost of speed. Setting this parameter to 1 enable the link quality extensions and tells OLSRD to select MPRs based on the link quality information. A neighbor is selected as an MPR, if it has the best route to any 2-hop neighbor. Setting this paramter to 2 not only selects MPRs based on the link quality but also considers link quality information when calculating the routing table. Setting this parameter to 0 or 1 seem fairly safe; while setting it to 2 may cause oLSRD to crash in some cases.

The next setting, the “Interfaces” list box, allows you to select the interfaces to which OLSR will bind. Of the remaining settings, the most notable are “HTTPInfo Port” (the port that HTTPInfo will listen on and “Enable Dynamic Gateway” (to enable the OLSR Dynamic Gateways feature, to add or remove Internet routes if a change is detected).


External Links:

Optimized Link State Routing Protocol on Wikipedia

The official olsrd web site

olsrd Link Quality Extensions

The post Using the OLSR Daemon in pfSense appeared first on pfSense Setup HQ.

MailScanner Installation and Configuration: Part One

$
0
0
MailScanner

MailScanner configuration under pfSense 2.1.3.

MailScanner is an e-mail security and anti-spam package for e-mail gateway systems. It is not designed to be run on Microsoft Windows desktop PCs. Instead, it is designed to be run on mail servers operated by companies and ISPs so that all their users and customers can be protected from one place. This avoids the need for any software to be installed on individual desktop PCs at all. The software works with any Unix-based system and is compatible with a wide range of mail transports, and comes with support for any combination of 25 different virus scanner packages, including the free ClamAV scanner.

MailScanner is implemented in around 50,000 lines of Perl. It links with other software packages in order to perform its functions:

  • E-mail server (e.g. sendmail)
  • Anti-virus software (e.g. ClamAV)
  • Anti-spam software (SpamAssassin)

MailScanner Installation

To install MailScanner under pfSense, navigate to System -> Packages, and scroll down to “Mailscanner” in the package list. Press the “plus” button to the right of the listing, and on the next page, press the “Confirm” button to confirm installation. It will take a few minutes for the Package Installer to extract and install MailScanner.

Once MailScanner is installed, there will be a new entry on the “Services” menu called “MailScanner”. If you navigate to it, you will be able to modify several settings. There are 9 tabs: “General”, “Attachments”, “Antivirus”, “Content”, “AntiSpam”, “Alerts”, “Reporting”, “XMLRPc Sync”, and “Help”. Under the “General” tab, the first heading is “System Settings”. The “Enable Mailscanner” check box will enable the mailscanner daemon if checked. “Max Children” allows you to choose how many MailScanner processes you want to run at a time (the default is 50. “Processing Incoming email” allows you to either scan messages or reject messages.


In the “Logging” secion, “Syslog Facility” allows you to specify what type of program is logging the message. The default is “mail”, and that is probably what you want to leave it at, but there may be circumstances when you may want to specifiy a different Syslog facility. See the Syslog entry on Wikipedia for a list of facility levels, or read RFC 1164 for more information. The “Logging” list box allows you to choose which messages to log.

“Advanced Settings” has some additional options. “Advanced features” allows you to select several options. By default, only “Deliver in Background” is selected. “Deliver Method” allows MailScanner to attempt immediate delivery of messages, or just place them in the outgoing queue for the MTA to deliver when it wants. “Minimum Code Status” lets you set the minimum acceptable code status; if MailScanner comes across a code that is not at least as stable as what it set here, it will stop running.

In the next article, we will continue our look at MailScanner’s settings.


External Links:

The official MailScanner web site
MailScanner at Wikipedia

The post MailScanner Installation and Configuration: Part One appeared first on pfSense Setup HQ.

MailScanner Installation and Configuration: Part Two

$
0
0

MailScannerIn the previous article, we introduced MailScanner and covered installation as well as basic configuration. In this article, we will look at some of the other configuration options.

If we navigate to Services -> MailScanner, there are nine tabs. The second tab is “Attachments“. Under the “Attachments” heading, there are several settings. The “Attachments features” list box controls how attachments are handled. “Expand TNEF” causes MailScanner to expand TNEF (Transport Neutral Encapsulation Format) attachments. TNEF is a proprietary e-mail attachment format used by Microsoft Outlook and Microsoft Exchange Server. “Deliver Unparsable TNEF” will do the opposite, and leave TNEF attachments unexpanded. “Find Archive By Content” will enable searching archives. “Unpack Microsoft Documents” will expand non-TNEF Microsoft attachments, and “Zip Attachments” will allow zip attachments through.

TNEF Contents” specifies what to do when TNEF attachments are expanded. If this is set to “no”, a TNEF attachment will be listed as an attachment, but not the attachments contained therein. If however, this is set to “add” or “replace”, then the attachments contained in the archive will be added to the list of attachments in the message, and recipients of messages sent in this format will be able to read the attachments even if they are not using Microsoft Outlook.


Maximum Attachment Size” specifies the maximum size (in bytes) of any attachment in a message. If this is set to zero, no attachments will be allowed. If this is set to less than zero, then no size checking will be done. The default value is -1.

Scrolling down, you will see edit boxes containing two separate config files: filename.rules.conf and filetypes.rules.conf. filename.rules.conf allows or denies certain files based on the file’s extension, while filetypes.rules.conf allows or denies certain file types based on their MIME (Multipurpose Internet Mail Extensions) type.

The next tab is “Antivirus“. under the “Antivirus” heading, there are several settings. The first is “Virus scanner features“. “Virus Scanning” is enabled by default, as is “Check Filenames In Password-Protected Archives“. In addition, you can enable such features as “Deliver Disinfected Files” (deliver files after they have been disinfected by the antivirus engine), “Still Deliver Silent Viruses“, “Block Encrypted Messages“, “Block Unencrypted Messages“, and “Allow Password Protected Archives“. The next setting is “Virus scanner“, which controls which virus scanner to use. Possible settings are “auto” (let MailScanner decide what to use), “clamav” (Clam AV), “clamd” (the Clam daemon), or “none” for no e-mail scanning. “Virus Scanner Timeout” controls the maximum length of time the commercial virus scanner is allowed to run for one batch of messages. The default is 300 seconds. The next heading, “Custom antivirus options“, allows you to add any custom parameters you need to specify.

The next tab is “Content“. The first heading is “Removing/Logging dangerous or potentially offensive content“. The first setting is the “Contents” list box, which determines what content for which MailScanner will scan. The default settings are “Dangerous content Scanning“, “Find Phishing Fraud“, “Also Find Numeric Phishing“, “Use stricter Phishing Net“, and “Highlight Phishing Fraud“. Other settings include “Allow Partial Messages“, “Allow External Message Bodies“, “Convert Dangerous HTML To Text“, “Convert HTML To Text“.


External Links:

The official MailScanner web site
MailScanner at Wikipedia

The post MailScanner Installation and Configuration: Part Two appeared first on pfSense Setup HQ.


Denial of Service (DoS) Attacks

$
0
0

denial of serviceDenial of Service (DoS) attacks are undertaken with the express purpose of preventing users from accessing and using a service they should otherwise be able to access. such attacks make malicious use of a variety of different standard protocols and tools. There is no single denial of service attack method, and the term has come to encompass a variety of different forms of attack. Some of the different types of denial of service attacks will be outlined here.

Types of Denial of Service (DoS) Attacks

  • Ping flood: This attack uses the Internet Message Protocol (ICMP) ping request to a server as a denial of service method. The strategy either involves sending ping requests in such vast quantities that the receiving system is unable to respond to valid user requests, or sending ping messages which are so large (known as the ping of death) that the system is unable to handle the request.
  • Smurfing: As with ping flood attacks, smurfing makes use of the TCP Internet Message Protocol (ICMP) ping request to mount DoS attacks. In a typical smurfing attack, the attacker sends a ping request to the broadcast address of the network containing the IP address of the victim, rather than to a specific machine. The network then acts as a smurf amplifier. The ping request is sent to all computers on the broadcast network, which in turn all reply to the IP address of the victim system, thereby overloading the victim with ping responses. The primary method for preventing smurf attacks is to block ICMP traffic through routers so that the ping responses are blocked from reaching internal servers. In addition, services like the Smurf Amplifier registry have given network service providers the ability to identify misconfigured networks and to take appropriate action.
  • TCP SYN Flood: We have already discussed SYN flood attacks as a means of achieving denial of service on this website, but I’ll mention it here again. This attack begins with a client attempting to establish a TCP connection with the victim server. The client sends a request to the server, which in turn returns an ACK package to acknowledge the connection. At this point in the communication, the client should respond with a message accepting the connection. Instead, the client sends another ACK which is respnded to by the server with yet another ACK. The client continues to send ACKs to the server with the effect of causing the server to hold sessions open in anticipation of the client sending the final packet required to complete the connection. As a result the server uses up all available sessions serving the malicious client, thereby prevneting access to other users. One possible countermeasure is to limit the number of connections from any one client (which can easily be done in pfSense), but if the SYN flood is coming from several different clients, it is hardly the ideal solution. Moreover, if the attacker may be using a spoofed IP address, so limiting the number of connections from that IP address may not help at all. Another possibility is to set up a SYN proxy, so that clients do not connect to a server until the SYN/SYN-ACK/ACK handshake is complete.


  • Fraggle: A fraggle attack is similar to a smurfing attack with the exception that the User Datagram Protocol (UDP) is used instead of using ICMP.
  • Land: Under a land attack, the attacker creates a fake SYN packet containing the same source and destination IP addresses and ports and sends it to the victim, causing the system to become confused when trying to respond to the packet.
  • Teardrop: A teardrop type of denial of service attack exploits a weakness in the TCP/IP implementation on some operating systems. The attack works by sending messages fragmented into multiple UDP packages. Ordinarily the operating system is able to reassemble the packets into a complete message by referencing data in each UDB packet. The teardrop attack works by corrupting the offset data in the UDP packets, making it impossible for the system to rebuild the original packets. On systems that are unable to handle this corruption, a crash is the most likely outcome of a teardrop attack.
  • Bonk: An effective attack on some Windows systems involving the transmission corrupted UDP packets to the DNS port (port 53) resulting in a system crash.
  • Boink: This is similar to the Bonk attack except that the corrupted UDP packets are sent to multiple ports, not just port 53.

These are the most common forms of denial of service attacks. In the next article, we will look at distributed denial of service (DDoS) attacks.


External Links:

Denial-of-service attack on Wikipedia

The post Denial of Service (DoS) Attacks appeared first on pfSense Setup HQ.

Distributed Denial of Service (DDoS) Attacks

$
0
0

distributed denial of serviceIn the previous article, we discussed denial of service (DoS) attacks. These attacks involve the use of a single client to launch an attack on a system or service. Distributed denial of service (DDoS) attacks use the same basic attack methodologies as outlined in the previous article, with the exception that the attacks are initiated from multiple client systems.

The way this typically works is that malicious parties will use viruses to subtly gain control over large numbers of computers (typically poorly-defended home computers connected to broadband Internet connections). Unbeknownst to the owner of the computer (which generally continues to function as normal) the system is essentially a zombie waiting to be given instructions. Once the malicious party has gathered an army of zombie computers they are instructed to participate in massive distributed denial of service attacks on unsuspecting victims. A large enough volume of zombie systems can, and indeed have been known to bring down even the largest and most scalable enterprise infrastructure, and even bring parts of the Internet itself to a grinding halt. Merely purchasing more incoming bandwidth than the current volume of attack might not help, because the attacker might be able to simply add more attack machines.

Distributed Denial of Service Attacks: Advantages and Types

There are several advantages to launching a distributed denial of service attack:

  1. Multiple machines can generate more attack traffic than one machine.
  2. Multiple machines are harder to turn off than one attack machine.
  3. The behavior of each attack machine can be stealthier, making it harder to track and shut down.

Distributed denial of service can take several forms. Malware can carry distributed denial of service attack mechanisms. One of the better-known examples of this was MyDoom. Its DoS mechanism was triggered on a specific date and time. this type of distributed denial of service involved hardcoding the target IP address prior to the release of the malware. No further interaction was necessary to launch the attack.


A system may also be compromised with a trojan, allowing the attacker to download a zombie agent, or the trojan may contain one. Attackers can also break into systems using automated tools that exploit flaws in programs that listen for connections from remote hosts. A compromised system becomes known as a bot, and they are controlled by handlers run by the attacker, known as botnets. Many of these tools use classic DoS attack methods centered on IP spoofing and amplification like smurf and fraggle attacks, as well as SYN floods.

A distributed denial of service attack may involve sending forged requests to a very large number of computers that will reply to the requests. Using Internet Protocol address spoofing, the source address is set to that of the targeted victim, which means that all the replies will go to and flood the target.

The primary line of defense for blocking distributed denial of service attacks, as with DoS attacks, is the firewall. Firewalls can be set up to have simple rules to allow or deny protocols, ports or IP addresses. In the case of a simple attack coming from a small number of unusual IP addresses for instance, one could put up a simple rule to drop all incoming traffic from those attackers. But most complex attacks will be hard to block with simple rules. Additionally, firewalls may be too deep in the network hierarchy, although they can prevent users from launching simple flooding type attacks from machines behind the firewall.

Some stateful firewalls, like OpenBSD’s pf (and pfSense, since it’s based on pf), can act as a proxy for connections. Normally when a client initiates a TCP connection to a server, PF will pass the handshake packets between the two endpoints as they arrive. pf can proxy the handshake: pf itself will complete the handshake with the client, initiate a handshake with the server, and then pass packets between the two. In the case of a TCP SYN flood attack, the attacker never completes the three-way handshake, so the attacker’s packets never reach the protected server, but legitimate clients will complete the handshake and get passed. this minimizes te impact of spoofed TCP SYN floods on the protected service, handling it in pf instead.

Most switched also have some automatic and system-wide rate limiting, traffic shaping, delayed binding, deep packet inspection and Bogon (bogus IP) filtering to detect and block denial of service attacks. This will work as long as the distributed denial of service attack is something that can be prevented by using them. SYN floods can be prevented using delayed binding. Content-based DoS or DDoS may be prevented using deep packet inspection. And attacks originating from dark addresses can be prevented using Bogon filtering.


External Links:

Denial of service attack on Wikipedia

PF: Packet Filtering at www.openbsd.org

The post Distributed Denial of Service (DDoS) Attacks appeared first on pfSense Setup HQ.

Back Door Attacks

$
0
0
Back door attacks

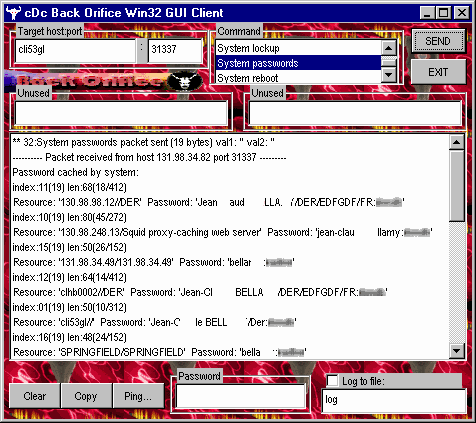
Back Orifice in action.

Back door attacks utilize programs that provide a mechanism for entering a system without going through the usual authentication process. This can either take the form of hidden access points intentionally put into an application by the original developers to aid in maintaining and debugging the software which were then left in when the software was installed by customers, or a malicious program that is placed on a system via a virus or other method which opens up the system to unauthorized access.

Back Door Attacks: Back Orifice, NetBus and Sub7

A number of back door programs have been discovered over the years which can be used in back door attacks. Here are some of them:

  • Back Orifice: The brainchild of Sir Dystic of Cult of the Dead Cow, its initial purpose was to show the lack of security in Windows 98 (it was released in 1998), Back Orifice has legitimate purposes, such as remote administration. But it also has attributes that make it suited for less benign uses such as back door attacks. The server can hide itself from cursory looks by users of the system. As the server can be installed without user interaction, it can be distributed as the payload of a Trojan horse. As a result, the antivirus industry immediately categorized the tool as malware and appended Back Orifice to their quarantine lists. Two sequel applications followed: Back Orifice 2000 (released in 1999), and Deep Back Orifice by French Canadian hacking group QHA.


  • NetBus: Another program that can be used in back door attacks, this is a software program for remotely controlling a Microsoft Windows computer system over a network. It was released in 1998, a few months before Back Orifice. There are two components to the client-server architecture. The server must be installed and run on the computer that should be remotely controlled. The server was an .EXE file with a size of about 500 KB. When started for the first time, the server would install itself on the host computer, including modifying the Windows registry so that i starts automatically on each system startup. The server is a faceless process listening for connections on port 12345, with the port number adjustable on later versions. the client was a separate program presenting a graphical user interface that allowed the user to perform a number of activities on the remote computer, such as keystroke logging, screen captures, file browsing, opening and closing the CD-tray, and using tunneling protocols. The NetBus client was designed work under Windows 95/98/ME/NT 4.0, as well as Windows 2000/XP. Major parts of the protocol are textual, and as a result, the server can be controlled by typing commands over a raw TCP connection from a non-Windows computer.
  • Sub7: Originally designed by someone with the handle “mobman”, the name “Sub7″ was derived by spelling “NetBus” backwards (“SubTen”) and swapping “ten” with “seven”. Because its typical use is to allow undetected and unauthorized access, Sub7 is usually described as a trojan horse by security experts. Like Back Orifice and NetBus, Sub7 is distributed with a server and a client. Sub7 has more features than NetBus, such as webcam capture, multiple port redirect, a user-friendly registry editor and chat, as well as penetration testing features, including a port scanner and a port redirector. Customizations possible with the Sub7 server editor included changing the port addresses, displaying a customized message upon installation. If the intent of the person deploying Sub7 is to launch a back door attack on a system, then the customized message can be used to deceive the victim and mask the true intent of the program. Nearly all antivirus programs can detect Sub7 and prevent it from being installed unless steps are taken to hide it.

Although the installation of any of the above mentioned back door programs will compromise network security, all of these threats can be prevented effectively by implementing a comprehensive virus scanning strategy.


External Links:

Back Orifice on Wikipedia

NetBus on Wikipedia

Sub7 on Wikipedia

The post Back Door Attacks appeared first on pfSense Setup HQ.

Phishing: Common Variations

$
0
0

phishingPhishing is the attempt to acquire sensitive information such as usernames, passwords, and credit card details be masquerading as a trustworthy entity in electronic communications. Communications purporting to be from popular social networking sites, auction sites, banks, online payment processors or IT administrators are commonly used to lure unsuspecting people. A phishing attack is most often initiated with a special type of spam containing a link to a misleading domain name, which appears to be a legitimate site. The e-mail tricks the recipient into visiting the spoofed web site, which mimics a site where the person would feel comfortable entering a username and password or other personal information.

Phishing has also been explained as leveraging or exploiting the design of web pages in a social engineering attack that tricks the user into thinking that they are in a legitimate and secure web session with a trusted site. In reality, the phishing site is designed to install malicious software or acquire personal information. The information is then used by the phisher for identity theft, to steal money, or to commit other fraudulent schemes.


Variations on Phishing

There are several variations on phishing. For example, “spear phishing” is targeted communication toward employees or members of a certain organization or online group. E-mails or other forms of communication are customized with information publicly available on web sites like Facebook or MySpace. In cases where e-mails are utilized, the e-mails will often direct people to a fake login page. One such early example was the early phishing attempts on AOL. A phisher would pose as an AOL staff member and send an instant message to a potential victim, asking them to reveal their password. In order to lure the victim into giving up sensitive information, the message might include imperatives such as “verify your account” or “confirm billing information”. Once the victim had revealed the password, the attacker could access and use the victim’s account for fraudulent purposes or spamming. Phishing became so prevalent on AOL that they added a line on all instant messages stating: “no one working at AOL will ask you for your password or billing information”, though even this did not prevent some people from giving away their passwords and personal information.

“Whaling” is phishing that is targeted at corporate executives, affluent people, and other “big phish”. Like spear phishing, whaling e-mails are often customized with information directed to the resident and sent to a relatively small number of people. One example of whaling was when thousands of bogus subpoenas appearing to be from the U.S. District Court in San Diego were “served” by e-mail on corporate executives. The e-mail contained an image of the official seal from the court and contained a link which purportedly linked to a copy of the entire subpoena. However, the link actually linked to a software installer that installed key-logging software on the user’s computer.

“Clone phishing” is a type of phishing attack whereby a legitimate, and previously delivered, e-mail containing an attachment or link has its content and recipient address (or addresses) taken and used to create an almost identical e-mail. The attachment or link within the e-mail is replaced with a malicious version and then sent from an e-mail address spoofed to appear to come from the original sender. It may claim to be a re-send of the original or possibly an updated version of the original. This technique could be used by the attacker to pivot from a previously infected machine and gain a foothold on another machine.


External Links:

Phishing on Wikipedia

The post Phishing: Common Variations appeared first on pfSense Setup HQ.

IP Spoofing and Defenses

$
0
0

IP spoofingIP address spoofing is the creation of IP packets with a source IP address with the purpose of concealing the identity of the sender or impersonating another computer system. The basis of spoofing involves masquerading as a trusted system in order to gain unauthorized access to a secure environment. IP spoofing involves modifying data to make it appear to originate from the IP address of a system that is trusted by a server or firewall. Using this approach, a host is able to pass through the IP filtering that would otherwise serve to prevent access.

The objective of IP spoofing in most, but not all cases, is to gain unauthorized access to a server or service. DNS spoofing differs from IP spoofing in that the objective is to send users to a different location than the one to which they thought they were going. For example, assume a user wants to login to Facebook. He enters the URL of Facebook into his browser. The browser contacts a Domain Name Server (DNS) which looks up the IP address which matches the URL. The user is then taken to the site located at that IP address, where he enters his login name and password. DNS spoofing involves the DNS server being compromised such that the Facebook URL is set to point to the IP address of a malicious party where a web site that looks like Facebook has been set up. Now when the user enters the URL in a browser, he is taken to the fake web site where his login name and password are captured and stored. The web site might then report that Facebook is offline for maintenance. The user decides to try again later. In the meantime, the attacker uses the victim’s credentials to log into his Facebook account and gain a foothold in committing identity theft. Even more nefarious would be if the attacker used DNS spoofing to point to a fake bank web site or another site where the attacker may be able to gain access to sensitive data.


IP spoofing is not, however, always carried out with malicious intent. In performance testing of websites, hundreds or even thousands of virtual users may be created, each executing a test script against the web site under test, in order to simulate what will happen when the system goes live and a large number of users log on at once. Commercial testing products can use IP spoofing, allowing each user its own IP address.

IP Spoofing: Defenses

There are several possible defenses against IP spoofing. Packet filtering is one defense against IP spoofing attacks. The gateway to a network usually performs ingress filtering, which is blocking of packets from outside the network with a source address inside the network. This prevents an outside attacker spoofing the address of an internal machine. Ideally, the gateway would also perform egress filtering on outgoing packets, which is blocking of packets from inside the network with a source address that is not inside. This prevents an attacker within the network performing filtering from launching IP spoofing attacks against external machines. In addition, many firewalls (pfSense included) practice bogon filtering, which means that IP packets from the Internet that claim to be from an area of the IP address space reserved, but not yet allocated or delegated by the Internet Assigned Numbers Authority (IANA) or a delegated Regional Internet Registry (RIR), are blocked.
Some upper layer protocols provide their own defense against IP spoofing attacks. For example, Transport Control Protocol (TCP) uses sequence numbers negotiated with the remote machine to ensure that arriving packets are part of an established connection. Since the attacker normally cannot see any reply packets, the sequence number must be guessed in order to hijack the connection.

Implementing encryption and authentication will also reduce spoofing threats. Both of these features are included in Ipv6, which will eliminate current spoofing threats. Additionally, a system administrator should eliminate all host-based authentication measures, which are sometimes common for machines on the same subnet. You should ensure that the proper authentication measures are in place and carries out over a secure, encrypted channel.

IP spoofing is a common problem without a simple solution, since it is inherent in the design of the TCP/IP protocol suite. Understanding how and why spoofing attacks are used, along with a few simple prevention methods, can help protect your network from these nefarious techniques.


External Links:

IP spoofing on Wikipedia

The post IP Spoofing and Defenses appeared first on pfSense Setup HQ.
Man-in-the-Middle Attacks

$
0
0

man-in-the-middle attackMan-in-the-middle attacks are perhaps one of the more complex and sophisticated forms of security breaching approaches. As the name implies, such an attack involves the surreptitious placement of a software agent between the client and server ends of a communication. In this scenario, neither end of the communication is aware that the malicious agent is in the line of communication. For the most part, the man in the middle simply relays the data transmissions between client and server as though nothing is happening. What is generally happening in parallel with this process is that the agent is also recording the data as it is passed through. A man-in-the-middle attack can succeed only when the attacker can impersonate each endpoint to the satisfaction of the other. Such an attack results in a third party gaining access to a variety of different types of data, from login and password credentials to proprietary and confidential information. In addition, it is possible for the man-in-the-middle agent to modify data, causing unsold problems for the victim.

Man-in-the-middle attacks have increased considerably since the introduction of wireless networking. As a result, there is no need for the hacker to connect to a wire. Instead, the data can simply be intercepted from anywhere within range of the wireless signal.


Preventing Man-in-the-Middle Attacks

In order to prevent MITM attacks, some form of endpoint authentication is helpful. Just using public key encryption is not enough to prevent such an attack. As an example, suppose A and B are trying to communicate, and C is trying to intercept said communications. If B sends A his public key and C intercepts it, he can replace B’s public key with his own and send it to A. If A then encrypts a message with C’s public key (believing it to be B’s public key), then when it is sent, C can intercept and read it, decrypting it with his private key. He can also re-encrypt the message using C’s public key and send it to C.

Thus, any private-public key system requires some means of ensuring that a MITM attack does not compromise its integrity. One possible method is public key infrastructures (PKI). The main defense in a mutual authentication. In this case, as well as the application validating the user, the user’s devices validate the application – hence distinguishing rogue applications from genuine applications. Another possibility is a recorded media attestment, which can be either a verbal communication of a shared value for each session, or an audio/visual communication of the public key hash. In addition, stronger mutual authentication, such as secret keys and passwords often helps thwart man-in-the-middle attacks.

Latency examination may be a useful means of detecting man-in-the-middle attacks. For example, if each party performs a long cryptographic hash function calculation that takes 20 seconds normally, and the calculation takes 60 seconds to reach each party, this can indicate a third party.

The integrity of public keys must generally be assured in some manner, but need not be secret. Passwords and shared secret keys have the additional secrecy requirement. Public keys can be verified by a certificate authority whose public key is distributed through a secure channel. Public keys can also be verified by a web of trust that distributes public keys through a secure channel.

Quantum cryptography protocols, which use quantum communication and quantum communication to perform cryptographic tasks, can be used to thwart man-in-the-middle attacks. One method quantum cryptography employs is quantum key distribution (QKD), which establishes a shared key between two parties. If a third party tries to eavesdrop and learn these bits, the messages will be disturbed and the original two parties will notice. The key is then typically used for encrypted communication.


External Links:

Man-in-the-middle attack on Wikipedia

The post Man-in-the-Middle Attacks appeared first on pfSense Setup HQ.

Replay Attacks and Possible Countermeasures

$
0
0

replay attackReplay attacks are a variation on the man-in-the-middle theme. In a replay attack an agent is once again placed within the client/server line of communication. In the case of a replay attack, however, the transaction data is recorded for the express purpose of allowing the data to be modified and replayed to the server at a later time for nefarious purposes.

An example of a replay attack is an instance where one party wants to prove their identity to a another party. If a third party eavesdrops on the conversation, they can intercept the password. Once the exchange is over, the eavesdropper can send the password and impersonate the party to whom the password belongs to gain unauthorized access to the other party.

Defenses Against Replay Attacks

As with other man-in-the-middle attacks, replay attacks can be countered using encryption, timestamps, serial numbers and packet sequences so that the server can detect that the data is being replayed from a previous session. One effective method of avoiding replay attacks which uses encryption is to use session tokens. Let us assume that A is required to send a password to B. If session tokens are used, B will send a one-time token to A, which A will then use to transform the password and send the result to B. On the other side, B performs the same transformation, and if both values match, the login will be successful. If C eavesdrops on A and B and captures the transformed password, C can try to use it to authenticate with B. But B will send a session token, and if C sends the transformed password captured earlier, the transformations will not match, and authentication will fail.


If C knows that B is using session tokens, C might be able to pose as B, presenting some predicted future token, and convince A to use that token in A’s transformation. C can then replay A’s reply at a later time, when the previously predicted token is presented by B, and B will accept the authentication. For that reason, session tokens should be chosen by a pseudo-random process.

One-time passwords are similar to session tokens in that the password expires after it has been used or after a very short period of time. They can be used to authenticate individual transactions in addition to sessions.

Replay attacks can also be thwarted by the use of message authentication codes (MACs), short pieces of information used to authenticate a message and to provide integrity and authenticity assurances on the message. MAC algorithms accept as input a secret key and an arbitrary-length message to be authentication, and outputs a MAC. This value protects both a message’s data integrity and its authenticity by virtue of the fact that the verifiers possessing the secret key to detect any changes to the message content.

Timestamping is another means of preventing a replay attack. Synchronization is achieved using a secure protocol. As an example, B can broadcast the time on their clock along with a message authentication code (MAC). If A wants to send B a message, they can include an estimate of the time on B’s clock in their message (which also sends a MAC). B only accepts messages for which the timestamp is within a reasonable tolerance.


External Links:

Replay attack on Wikipedia

The post Replay Attacks and Possible Countermeasures appeared first on pfSense Setup HQ.


TCP/IP Hijacking

$
0
0

TCP/IP hijackingTCP/IP hijacking is a technique that uses spoofed packets to take over a connection between a victim and a host machine. It is similar to a man-in-the-middle attack, except that the rogue agent sends a reset request to the client so that the client loses contact with the server while the rogue system assumes the role of the legitimate client, continuing the session. This technique is especially useful when the victim uses a one-time password to connect to the host machine. A one-time password can, as its name implies, be used to authenticate once and only once; thus, sniffing the authentication is useless for the attacker.

To carry out a TCP/IP hijacking attack, the attacker must be on the same network as the victim. This gives the attacker the ability to sniff the local network segment and, as a result, all the details of open TCP connections can be pulled from the headers. Each TCP packet contains a sequence number in its header. This sequence number is incremented with each packet sent to ensure that packets are received in the correct order. While sniffing packets, the attacker has access to the sequence numbers for a connection between a victim and a host machine. Then the attacker sends a spoofed packet from the victim’s IP address to the host machine, using the sniffed sequence number to provide the proper acknowledgment number. The host machine will receive the spoofed packet with the correct acknowledgment number and will have no reason to believe the packet did not come from the victim’s machine; thus the TCP/IP hijacking attempt will be successful.


Forms of TCP/IP Hijacking

One form of TCP/IP hijacking is to inject an authentic-looking reset (RST) packet. If the source is spoofed and the acknowledgment number is correct, the receiving side will believe that the source actually sent the reset packet, and the connection will be reset. The attacker could perform such an attack using a program that uses the libpcap and libnet libraries. libpcap would sniff the packets, and libnet would inject RST packets. The program does not need to look at every packet, but only established TCP connections to a target IP, so the libcpap function calls would be structured accordingly. It is relatively easy to come up with a filter rule for packets that have a certain destination IP. It is somewhat more difficult to filter for established connections, but since all established connections will have the ACK flag in the TCP header TCP flags, the program can look for that.

Another type of TCP/IP hijacking is continued hijacking. The spoofed packet does not need to be an RST packet; the spoof packet can contain data. When the host receives the spoofed packet, it will increment the sequence number and responds to the victim’s IP. Since the victim’s machine does not know about the spoofed packet, the host machine’s response has an incorrect sequence number, so the victim ignores that response packet. And since the victim’s machine ignored the host machine’s response packet, the victim’s sequence number count is off. Therefore, any packet the victim tries to send to the host machine will have an incorrect sequence number as well, causing the host machine to ignore it. In this instance, both legitimate sides of the connection have incorrect sequence numbers, resulting in a desynchronized state. And since the attacker sent out the first spoofed packet that caused all this chaos, it can keep track of sequence numbers and continue spoofing packets from the victim’s IP address to the host machine. This lets the attacker continue communicating with the host machine while the victim’s connection hangs.


External Links:

TCP Hijacking at TechRepublic

The post TCP/IP Hijacking appeared first on pfSense Setup HQ.

Software Exploits

$
0
0

software exploitA software exploit is a piece of software or sequence of commands that takes advantage of a bug, glitch or vulnerability in order to cause unintended or unanticipated behavior to occur. Software applications and the operating systems on which the run are vastly complex entities. Regardless of how carefully written and thoroughly tested a piece of software is, it typically will contain bugs or vulnerabilities that can be exploited. Such software exploits frequently include things like gaining control of a computer system, allowing privilege escalation, or a denial-of-service attack.

Types of Software Exploits

Software exploits can be categorized and named according to certain criteria:

  • The type of vulnerability they exploit (software vulnerabilities can arise from either insufficient testing or the lack of an audit trail).
  • Whether they need to be run on the same machine as the program that has the vulnerability (local) or can be run on one machine to attack a program running on another machine (remote).
  • The result of running the exploit.


The most common categorization is by how the exploit contacts the vulnerable software. A remote exploit works over a network and exploits the security vulnerability without any prior access to the vulnerable system, whereas a local exploit requires prior access to the vulnerable system and usually increases the privileges of the person running the exploit past those granted by the system administrator. There are also exploits against client applications. These usually consist of modified servers that send an exploit if accessed with a client application. Such exploits can be considered remote exploits, although they may require some interaction with the user and thus may be used in combination with the social engineering method.

Another classification is by the action against the vulnerable system: unauthorized data access, arbitrary code execution, and denial-of-service are all examples. Many exploits are designed to provide superuser-level access to a computer system. It is also possible to use several exploits first to gain low-level access, then to escalate privileges until one reaches root.

Often, when a software exploit is publicized, the vulnerability is fixed through a patch and the exploit becomes obsolete until newer versions of the software become available. This is the reason why some hackers do not publish their exploits, but keep them private. Such exploits are referred to as zero day exploits. Obtaining access to such exploits is the primary desire of some unskilled hackers.

While it is impossible to completely eliminate the risk of software exploitations, the threat can be greatly reduced by keeping operating systems and applications patched with the latest vendor updates and to develop applications using programming languages such as C# and Java, which provide managed environments that reduce the risk of some exploitations.


External Links:

Software Exploitation, Malicious Code and Social Engineering at Techtopia

The post Software Exploits appeared first on pfSense Setup HQ.

Securing Ports and Services

$
0
0

Securing portsA computer system that is not connected to a network is a rarity. While this provides some flexibility in terms of remote services, data and information that are available, it also brings considerable risks. It is probably correct to assume that any computer connected to a network is in danger of being attacked in some way. Secure computer environments, in many cases used by government defense organizations, often have no contact with the outside world, even if they are networked to each other, and as a result, they often have greater success in securing ports and services.

The predominant network communications protocol is TCP/IP. It is the protocol used by the Internet and thus has supplanted most of the formerly popular protocols used for local area networks (LANs). However, TCP/IP was conceived to send and receive data reliably, not to secure it. Securing the data (and securing ports) is the job of applications listening and sending on specific ports.

TCP/IP defines a total of 65,535 ports of which 1023 are considered to be well-known ports. These are, of course, not physical ports into which network cables are connected, but rather virtual ports on each network connection which can be used by applications and services to communicate over a TCP/IP connection. In reality, the number of ports that are used by popular network clients and services comprises an even smaller subset of the well-known group of ports, which makes the task of securing ports somewhat easier.

There are a number of different TCP/IP services which can be provided by an operating system. Such services include HTTP for running a web server, FTP for allowing file transfers, SSH and Telnet for providing remote login access and SMTP for the transport of e-mail messages. Each service in turn is assigned a standard TCP/IP port. For example, port 80 is for HTTP requests; port 21 is for File Transfer Protocol (FTP); port 17 is for the quote of the day.


Securing Ports and Services: How It’s Done

A large part of securing ports and securing servers involves defining roles, and based on the roles, defining which services and ports should be enabled. For example, a server that is to act solely as a web server should only run the HTTP service, and perhaps SSH for remote administration access. All other services should be disabled, and ideally, removed entirely from the operating system. Removing the service will make it harder for an intruder to re-enable the service. Thus, while it is necessary for some ports to be open to Internet traffic, it is also necessary to ensure that only the bare minimum are exposed and that the software on the system is as up to date as possible.

Securing a system involves (a) removing any unnecessary services from the operating system and (b) ensuring that the ports associated with these non-essential services are blocked using a firewall.

Many operating systems are installed with a number of services installed and activated by default. Before installing a new operating system, it is essential that the installation be carefully planned. This involves deciding which services are not required and identifying which services have been installed and enabled by default. It helps if deployment is not rushed; the fewer services and open ports available on a system, the smaller the surface area and opportunities for attackers. In addition, it is essential to turn on automatic updates, both for Windows and Linux, as well as for your antivirus software.

As for the firewall, you will want to have a dedicated firewall between your network and the Internet. Although not absolutely essential, it is good practice to have a personal firewall on each computer. In securing ports, you should make sure your firewall is closed to all traffic other than to the ports you know should be open. Because some malicious software can silently open ports, it is a good idea to check them yourself and close any that you do not need open.


External Links:

TCP/UDP ports on Wikipedia

How to secure your TCP/IP ports at techradar.pro

The post Securing Ports and Services appeared first on pfSense Setup HQ.

Unbound DNS

$
0
0
Unbound DNS

Configuring Unbound DNS in pfSense.

Unbound DNS is a validating, recursive and caching DNS server software product. The C implementation of Unbound is developed and maintained by NLnet Labs, and is based on ideas and algorithms taken from a Java prototype developed by Verisign labs, Nominet, Kirei, and ep.net. It is distributed free of charge under the BSD license.

Unbound can run as a server, as a daemon in the background, answering DNS queries from the network. Alternatively, it can link to an application as a library, and answer DNS queries for the application. Here, we are concerned with running unbound as a server by installing the Unbound package in pfSense.

Unbound DNS: Installation and Configuration

To install the Unbound package, navigate to System -> Packages, and scroll down to the Unbound entry in the packages listing. On the right side of the listing, press the “plus” button to select the package. On the next page, press the “Confirm” button to confirm installation. Installation should complete within a few minutes. Once it is complete, you should see the following text:

Unbound setup instructions:
Please visit Services: Unbound DNS to configure the Unbound DNS service. Remember you will need to disable Services: DNS Forwarder before starting Unbound. Also note if your DHCP server makes use of pfSense as the DNS server, then you will now need to add the IP address of the respective interface to the DNS servers field, in the DHCP server configuration page.

After installation, there will be a new item on the Services menu called “Unbound DNS”. Navigate to Services -> Unbound DNS to begin configuration. The first tab, “Unbound DNS Settings”, allows you to configure the basic settings. First is the “Enable Unbound” check box, which lets you enable the use of Unbound as your DNS forwarder. Next is “Network Interface”, which allows you to specify the network interface(s) the server will listen on. “Query interfaces” allows you to specify different network interface(s) the server will use to send queries to authoritative servers.


Next is the “Enable DNSSEC” check box. DNSSEC (Domain Name System Security Extensions) is a suite of specifications for securing certain kinds of DNS information. It was designed to protect applications, as well as caching resolvers serving those applications, from using forged or manipulated DNS data. If you wish to use DNSSEC to validate your DNS queries, it is recommended that you disable forwarding (the next setting) and allow Unbound to do all your DNS resolving. You can leave the forwarding mode enabled, though, if you are certain that your upstream DNS servers also provide DNSSEC support. Forwarding mode will allow you to configure the server to make use of other DNS servers configured in System -> General Setup.

Next is the “Private Address support” check box. With this option enabled, RFC1918 address are stripped away from DNS answers. Additionally, the DNSSEC validator may mark the answers bogus. You will want to disable this if you have zones that return addresses that are private. With this option enabled, any domain overrides configured will be exempt from this check. The “Register DHCP static mappings” check box causes DHCP static mappings to be registered in the DNS forwarder, so their names can be resolved.

The next two options are “TXT Comment Support” and “Cache Restoration Support”. If the “TXT Comment Support” is checked, then any descriptions associated with host entgries and DHCP static mappings will create a corresponding TXT record. This allows you to view somments you have added using DNS. To view these comments, one would simply execute the following command: dig @<pfSense_ip> host_entry.txt. “Cache Restoration Support” ensures that the current Unbound cache containing all the DNS records is saved to disk. Thus, if the service or server is restarted, the cache is restored resulting in quicker responses in resolving DNS queries. Note that any old or wrong data will be restored.

Once these options are saved, you will be able to use Unbound in pfSense to do all your DNS resolving. In the next article, we will look at some of the other settings.


External Links:

The official Unbound web site

Unbound package at doc.pfsense.org

The post Unbound DNS appeared first on pfSense Setup HQ.

Unbound DNS: Additional Settings

$
0
0

In the previous article, we introduced Unbound and covered some of the most common settings. In this article, we will cover some additional settings.

Under Services -> Unbound DNS, the “Unbound DNS Settings” tab has a subheading called “Statistics“. Unbound provides various statistics relating to the number of queries that Unbound handles. These statistics are printed to the Unbound log file, which can be found at /var/log/unbound.log. This log file is viewable via Status: Package logs or via the command line using the command “clog“.

There are a few configurable options. The “Enable Statistics” check box allows you to enable the use of statistics. Checking this will cause Unbound to generate statistics which can be used to generate other information. The “Statistics Interval” dropdown box allows you to select the time as to when statistics will be written to the Unbound log file (anywhere from 5 minutes to 2 hours). If “Yes” is selected in the “Enter Cumulative Statistics” dropdown box, the statistics collected will be cumulative and will not be cleared after each report has been logged. The “Extended Statistics” check box will cause Unbound to log the type of queries that have been handled by the resolver. Otherwise, Unbound only logs the total number of queries collected.


Advanced Settings and ACL Lists

The “Unbound DNS Advanced Settings” tab has a number of additional settings that may be useful. The “Hide Identity” check box will cause Unbound (if checked) to refuse id.server and hostname.bin queries. The “Hide Version” checkbox will cause Unbound (if checked) to refuse version.server and version.bind queries. As a result, any attempt to hack Unbound will potentially be thwarted by depriving the hacker of this vital information. The “Log level verbosity” check box allows you to select the logging verbosity. “Level 0” specifies no verbosity (only errors are logged), while each higher level of logging verbosity (up to Level 5) provides additional information. The “Message Cache Size” dropdown box allows you to alter the size of the message cache. The message cache stores DNS rcodes and validation statuses. The RRSet cache will automatically be set to twice this amount (the RRSet cache contains the RR data).

The “Outgoing TCP Buffers” dropdown box allows you to select the number of outgoing TCP buffers to allocate per thread. If the value is set to 0, no TCP queries to authoritative servers are done. The “Incoming TCP Buffers” dropdown box allows you to select the number of incoming TCP buffers to allocate per thread. Once again, if the value is set to 0, then no TCP queries from clients are accepted.

The next tab is “Unbound DNS ACLs“. Here you can define access control lists for Unbound. Click on the “plus” sign on the right side of the page to add a new ACL. The “ACL name” edit box allows you to provide an ACL name. The “Action” dropdown box allows you to choose what to do with DNS requests that match the specified criteria. “Deny” causes Unbound to stop queries from hosts within the specified netblock. “Refuse” will also stop queries from hosts within the specified netblock, but will send a DNS rcode REFUSED error message back to the client. “Allow” will allow queries from hosts within the specified netblock. “Allow Snoop” will allow recursive and nonrecursive access from hosts within the specified netblock.

At “Networks“, you can press the “plus” button and specify a netblock or series of netblocks (along with descriptions) to which the action will be applied. Finally, you can add a description in the “Description” edit box. When you are done setting up the ACL, press the “Save” button to save the changes (or “Cancel” to cancel).

Unbound also provides various command line utilities to manage your DNS cache server. To remove a name from the cache, type:

unbound-control flush [name]

where [name] is a record of any type (including A, AAAA, NS<SOA, CNAME, DNAME, MX, PTR, SRV and NAPTR). If you want to remove a name of a specific type, then type:

unbound-control flush_type [name] [type]

If you want to flush an entire zone, type:

unbound-control flush_zone [name]

This will remove all information at or below the name from the cache. For example, if you specify .com, all entries below .com will be removed.

To determine the name servers that will be queried to lookup a zone, type:

unbound-control lookup [name]


External Links:

Unbound package at doc.pfsense.org

The post Unbound DNS: Additional Settings appeared first on pfSense Setup HQ.

Viewing all 115 articles
Browse latest View live